概要

- AppLovinのSDK導入メモ。
- AdMob等他の広告SDKを何もいれてないプロジェクトに、AppLovinのみをいれてインタースティシャル広告を表示するところまでです。
- Android / iOS 両OS。
- やった内容は公式ドキュメントの
Getting Startedです。
環境
- 実施日 2018/08/04
- Unity 2018.1.5f1(CloudBuildはUnity 2018.2.2f1)
- AppLovin Unity Plugin 5.1.0
- Google Play Service Resolver 1.2.80.0
iOS用の設定
アカウント登録
- ここから登録
- SMSによる二要素認証も流れで設定した
- 登録完了したらすぐにダッシュボードに入れた
iOSのSDK導入
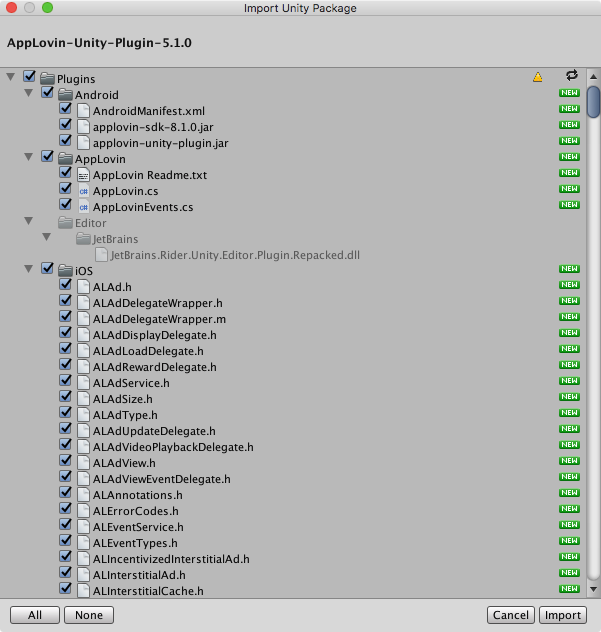
パッケージのインポート
- ダッシュボード右上の
Getting Started->iOS->Unity3d Integration - 表示されてるリンクからプラグインダウンロード
- 2018/08/04時点では
AppLovin-Unity-Plugin-5.1.0.unitypackageだった
- 2018/08/04時点では
- 全部インポート
依存するフレームワークの選択
ドキュメントにこう書いてあるのをやる
Link the Following Frameworks in Your Project

- AdSupport
- AVFoundation
- CoreGraphics
- CoreMedia
- CoreTelephony
- StoreKit
- SystemConfiguration
- UIKit
- WebKit (NEW)
- libz.tbd (NEW)
- Unityエディタ上で
Assets/Plugins/iOS/ALAdを選択(他どれでもいいけど一番上だったからこれ) - 下記を選択
- AdSupport
- AVFoundation
- CoreGraphics
- CoreMedia
- CoreTelephony
- StoreKit
- SystemConfiguration
- UIKit
- WebKit (NEW)
- libz.tbd (NEW)


libz.tbdだけ見つからないのでXCode API使ってスクリプトから追加する- 次のXcode Flagsも一緒にスクリプトで設定する
Xcode Flagsの設定
Enable Xcode Flags
The -ObjC flag must be added for static libraries (such as our SDK) to run correctly.
To enable the -ObjC flag, click on your project settings, go to Build Settings, search for Other Linker Flags and add -ObjC
Other Linker Flagsに-ObjCを追加すればいいそうな。Assets/Plugins/Editor/PostBuildProcess.csを作成
using System.IO;
using UnityEditor;
using UnityEditor.Callbacks;
using UnityEditor.iOS.Xcode;

namespace Plugins.Editor
{
    public class PostBuildProcess
    {
        [PostProcessBuild]
        public static void OnPostProcessBuild(BuildTarget buildTarget, string path)
        {
            if (buildTarget == BuildTarget.iOS)
            {
                ProcessForiOS(path);
            }
        }

        private static void ProcessForiOS(string path)
        {
            string pjPath = path + "/Unity-iPhone.xcodeproj/project.pbxproj";
            PBXProject pj = new PBXProject();
            pj.ReadFromString(File.ReadAllText(pjPath));

            string target = pj.TargetGuidByName("Unity-iPhone");

            //libz.tbdの追加
            pj.AddFileToBuild(target, pj.AddFile("usr/lib/libz.tbd", "Frameworks/libz.tbd", PBXSourceTree.Sdk));

            //Other Linker Flags
            pj.AddBuildProperty(target, "OTHER_LDFLAGS", "-ObjC");

            File.WriteAllText(pjPath, pj.WriteToString());
        }
    }
}
- これで
libz.tbdと-ObjCの設定ができるはず。
XCode側で確認
- Unity -> Build And Run -> XCode側


- 大丈夫そう。
動作確認
Initialization
You will need to retrieve your SDK key from your dashboard and use it during initialization. Initialize the SDK as soon as possible after your app starts by calling the InitializeSdk method.
AppLovin.SetSdkKey("hogehogehogehogehogehogehogehogehoge");//hogehogeのところは自分のAPIKey
AppLovin.InitializeSdk();
適当なスクリプト作って実験
using UnityEngine;

public class AppLovinSample : MonoBehaviour
{
    void Start()
    {
        AppLovin.SetSdkKey("hogehogehogehogehogehogehogehogehoge");
        AppLovin.InitializeSdk();

        Invoke("ShowInterstitial", 10);
    }

    void ShowInterstitial()
    {
        AppLovin.ShowInterstitial();
    }
}
広告でた!!!
管理画面の確認
広告表示してしばらくしてから管理画面を開くと、アプリが表示されていました。

ここからテストモードの切り替えとかできるみたいです。
Android用の設定
AndroidSDKの導入
AndroidManifestの設定
unitypackageはIOSと共通のようなのでスキップ- AndroidManifestにSDKキーを書き加える
Assets/Plugins/Android/AndroidManifest.xml
下記2箇所。他のSDKとか使ってる場合はよしなに編集。
<manifest xmlns:android="http://schemas.android.com/apk/res/android"
    package="YOUR_PACKAGE_NAME"
    android:installLocation="preferExternal"
        <meta-data
            android:name="applovin.sdk.key"
            android:value="YOUR_SDK_KEY" />
Add Google Play Services to your App
Due to new requirements by Google, you'll need to integrate the Google Play Services SDK into your app. This is mandatory; without Google Play Services, the SDK cannot function.
- ここを見てやれとのこと
- 全然わからん
- Play Service Resolverを試す
- https://github.com/googlesamples/unity-jar-resolver
- AdMobやAnalytics等をいれている場合はResolverも入ってるはず。
- 今回は素のUnityにAppLovinだけ入れるのでPlayServiceをいれてあげる必要がある。
- Unityのプラットフォーム設定をAndroidに切り替え
- 上記リポジトリのrootにある
unitypackageをダウンロード- 2018/08/05現在、
play-services-resolver-1.2.80.0.unitypackageだった。
- 2018/08/05現在、
- Unityにドーン
- 下記スクリプトを作成
using Google.JarResolver;
using UnityEditor;

[InitializeOnLoad]
public static class AdsDependencies
{
    static AdsDependencies()
    {
        PlayServicesSupport svcSupport = PlayServicesSupport.CreateInstance(
            "AdsSample", EditorPrefs.GetString("AndroidSdkRoot"), "ProjectSettings");

        svcSupport.DependOn("com.google.android.gms", "play-services-ads", "15.0.1");
    }
}
いろいろ取り込まれた

動作確認
- Build And Run
- Androidでも広告出た!!
まとめ
- 公式のドキュメント通りで問題なく動きました。
- これでインタースティシャル動画の表示はできたので次は動画リワードの実装〜

